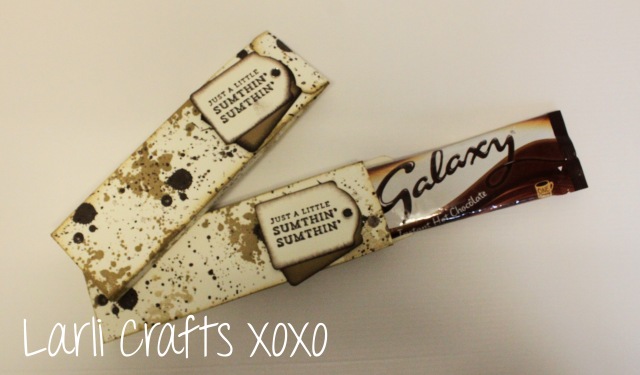
Oooh, it’s getting colder! Anyone noticed? Everyone on Facebook certainly has! Haha 🙂
I love this time of year! The leaves have changed colour, nights are longer… Autumn/Winter for me means the comfy jumpers, warm gloves and boots come out of hiding. Yay! And I get to spend my evenings cosied up with my favourite films/books/blogs with my huge snuggly blanket in front of the fire with a big mug of hot chocolate with loads of mini marshmallows 🙂 Mmmm…
I can’t think of a better way to spend cold evenings, and as the big “C” is approaching I wanted to share this cosiness. But I can’t knit blankets, so I came up with these as a cute and quick gift… (I’m thinking teacher gifts & stocking fillers!)
Firstly, I measured my sachet on my Stampin’ Up! Grid Paper. These particular sachets measure 6 1/2 inches tall by 2 inches wide, and almost 1/2 inch deep (that’s a lot of chocolate!)
To make the box I did the following:
1- Cut Very Vanilla cardstock to 8 x 5 1/2 inches.
2 – Randomly stamp the large ‘splatter’ from the Gorgeous Grunge stamp set using Early Espresso ink pad. Then the middle sized splatter in Baked Brown Sugar ink, and finally the small splatter in a both ink colours.
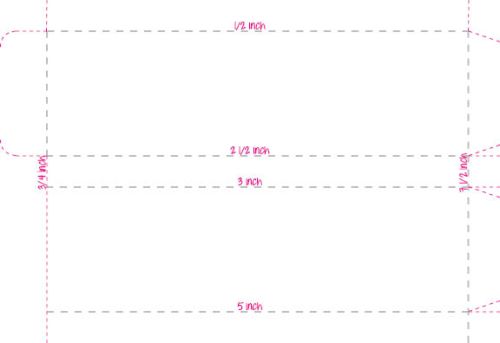
3 – With the stamped side facing up; Score the cardstock on the shorter side at 1/2, 2 1/2, 3 and 5 inches.
Score the longer side at 1/2 and 7 1/4 inches. 
See PDF template.
4 – Fold and burnish along score lines. (in Grey – Measurements on template in Pink)
5 – Trim as shown (Pink on the template). Round corners of top flap.
6 – Apply Sticky Strip along outside tab. Fold the box together to close.
7 – Fold in flaps to close the bottom of the box and adhere with sticky strip.
8 – Sponge all edges of box using Baked Brown Sugar ink (Optional)
9 – Pinch together the top of the box, so flap folds over to the front.
For the decoration and close:
1 – Stamp A Little Sumthin’ Sumthin’ stamp onto Very Vanilla Cardstock in Early Espresso ink.
2 – Cut out using the Note Tag Punch
3 – Punch another tag from Baked Brown Sugar cardstock
4 – Sponge edges of both tags with Early Espresso Ink
5 – Pierce hole through both tags, and secure with a Candy Dot Brad Base, topped with Early Espresso Candy Dot.
6 – Push brad through front of box, just below flap to secure in place
7 – (Optional) Secure tags in place using mini glue dots
All that’s left to do is put the sachet in the box, and give it away 🙂
Hope you like?
Speak to you soon
Debbie xoxo
Supply List
Cardstock: Very Vanilla, Baked Brown Sugar
Stamp sets: Gorgeous Grunge, Sumthin’ Sumthin’
Punches: PL Corner Punch, Note Tag (A/W ’14)
Ink: Baked Brown Sugar, Early Espresso
Embellishments: Neutral Candy Dots, Candy Dot Brad Bases
Adhesives: Sticky Strip, Mini Glue Dots
Equipment: Grid Paper, Stampin’ Trimmer, Simply Scored, Clear Mount Stampin’ Block, Stampin’ Scrub, Stampin’ Mist, Paper Piercing Tool, Sponges


