Recently I moved house, and I wanted to give friends my new address… But I wanted something a little bit more special than a text message. I wanted to get creative; so I chose to make these little note cards…

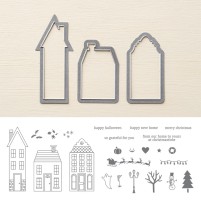
Luckily for me, the new Autumn/Winter 2014 catalogue launched just in time, and contained a lovely little stamp set called Holiday Home, with coordinating framelits, available as a bundle here with a saving of 15%!
This may well be a holiday set, but, as with all things Stampin’ Up! it’s versatile, and I think it’s just perfect for this!
If you would like to make your own cards, here is how I made mine…

1 – Stamp taller houses in Smoky Slate onto Whisper White cardstock. 2 houses per card.
2 – Stamp small house in chosen ink colours (I used the brights collection). 1 house per card.
3 -Using your Big Shot cut all houses out with co-ordinating Framelits die. I roughly trimmed my sheet down, and held the die in place using washi tape. (The Magnetic Platform is on my wish list!)
4 – Adhere 2 taller houses towards the bottom of card base using Mini Glue Dots.
5 – Place a smaller house over the two taller ones, adhered with Stampin’ Dimensionals to add height.
6 – Stamp “Happy New Home” sentiment at the top of the card in matching ink colour, with contrasting Candy Dots on either side.
That is your card done!
However, I wanted to add a little something to the envelopes too! So…
1 – Stamp smaller house stamp at an angle on the lower corner of envelope in coloured ink (I used the same as I had on the card).
2 – Mask off the coloured stamp using a spare cut out (I cut another house from scrap cardstock, and held it over the edge with a piece of washi tape)
3 – Using the taller house stamp, and Smoky Slate ink, stamp over the masked house, to create the impression of a layered effect similar to the cards.
All done! Now I have a coordinating set of New Home cards and envelopes 🙂
Products used
Stamp Set: Holiday Home (Bundle)
Cardstock: Whisper White Note Cards and Envelopes, Whisper White
Ink: Smoky Slate Classic Stampin’ Pad, Brights Classic Stampin’ Pads
Embellishments: Brights Candy Dots
Adhesives: Mini Glue Dots, Stampin’ Dimensionals
Equipment: Big Shot Die Cut Machine
If you have any questions or queries, please feel to contact me below, or via my Facebook page.
Happy Crafting!
Debbie x
Don’t forget this week is the Stampin’ Up! Stamp, Stock & Save promotion running from 1-6th October!